CrowdSec WAF QuickStart for Traefik
Objectives
This quickstart walks you through pairing the CrowdSec AppSec Component with the Traefik reverse proxy across three deployment models: a single Docker container, a Docker Compose stack, and the official Helm chart on Kubernetes. You'll install the required AppSec collections, configure the acquisition endpoint that exposes the inspection service, and wire the Traefik plugin so requests are evaluated before reaching your applications. We'll finish by pointing you to the Stack health check so you can validate the bouncer and AppSec stack end to end.
Pre-requisites
-
If you're new to the AppSec Component or Web Application Firewalls, start with the Introduction for a better understanding.
-
It's assumed that you have already installed:
- CrowdSec Security Engine: for installation, refer to the QuickStart guide. The AppSec Component, which analyzes HTTP requests, is included within the security engine as a Acquisition.
- Traefik Plugin Remediation Component: Thanks to maxlerebourg and team they created a Traefik Plugin that allows you to block requests directly from Traefik.
AppSec Component Setup
Collection installation
To begin setting up the AppSec Component, the initial step is to install a relevant set of rules.
We will utilize the crowdsecurity/appsec-virtual-patching collection, which offers a wide range of rules aimed at identifying and preventing the exploitation of known vulnerabilities.
This collection is regularly updated to include protection against newly discovered vulnerabilities. Upon installation, it receives automatic daily updates to ensure your protection is always current.
Furthermore we also install the crowdsecurity/appsec-generic-rules collection. This collection contains detection scenarios for generic attack vectors. It provides some protection in cases where specific scenarios for vulnerabilities do not exist (yet).
On the machine where the Security Engine is installed, just execute the following command:
- Docker
- Exec
- Compose
## This command should be used when you are persisting /etc/crowdsec/ on the host
docker exec -it crowdsec cscli collections install crowdsecurity/appsec-virtual-patching crowdsecurity/appsec-generic-rules
services:
crowdsec:
  environment
      ## Please note the spaces between the collections names (hence why the quotes are needed)
      - 'COLLECTIONS=crowdsecurity/appsec-virtual-patching crowdsecurity/appsec-generic-rules'
Executing this command or updating the compose will install the following items:
- The AppSec Rules contain the definition of malevolent requests to be matched and stopped.
- The AppSec Configuration links together a set of rules to provide a coherent set.
- The CrowdSec Parser and CrowdSec Scenario(s) are used to detect and remediate persistent attacks.
Once you have updated your compose or installed via the command line, will we need to restart the container. However, before we do that, we need to setup the acquisition for the AppSec Component.
Setup the Acquisition
Depending on how you are running the CrowdSec Security Engine, you will need to configure the acquisition for the AppSec Component.
If you have a folder in which you are persisting the configuration files, you can create a appsec.yaml and mount it into the container.
There steps will change depending on how you are running the Security Engine. If you are running via docker run then you should launch the container within the same directory as the appsec.yaml file. If you are using docker-compose you can use a relative file mount to mount the appsec.yaml file.
Steps:
- Change to the location where you exectued the
docker runordocker composecommand. - Create a
appsec.yamlfile at the base of the directory. - Add the following content to the
appsec.yamlfile.
appsec_config: crowdsecurity/appsec-default
labels:
    type: appsec
listen_addr: 0.0.0.0:7422
source: appsec
- Edit the
docker runordocker-composecommand to include theappsec.yamlfile.
- Docker
- Exec
- Compose
# Note if you have a docker run already running you will need to stop it before running this command
docker run -d --name crowdsec -v /path/to/orginal:/etc/crowdsec -v ./appsec.yaml:/etc/crowdsec/acquis.d/appsec.yaml crowdsecurity/crowdsec
services:
crowdsec:
  volumes:
    - /path/to/orginal:/etc/crowdsec ## or named volumes
    - ./appsec.yaml:/etc/crowdsec/acquis.d/appsec.yaml
Once you have created the appsec.yaml file and mounted it into the container, you can recreate the container.
Once you have updated the compose file to include the volume mount and the updated environment variable, you can restart the container.
docker compose down crowdsec
docker compose rm crowdsec
docker compose up -d crowdsec
Remediation Component Setup
As stated previously this guide already presumes you have the Traefik Plugin installed. If you do not have the Traefik Plugin installed, please refer to the official documentation for installation instructions.
Configuration
Depending on how you configured the Traefik Plugin, you will need to update the configuration to include the AppSec configuration.
If you have defined a dynamic configuration file for Traefik, you can add the following configuration to the file.
# Dynamic configuration
http:
  routers:
    my-router:
      rule: host(`whoami.localhost`)
      service: service-foo
      entryPoints:
        - web
      middlewares:
        - crowdsec

  services:
    service-foo:
      loadBalancer:
        servers:
          - url: http://127.0.0.1:5000

  middlewares:
    crowdsec:
      plugin:
        bouncer:
          enabled: true
          crowdsecAppsecEnabled: true
          crowdsecAppsecHost: crowdsec:7422
          crowdsecAppsecFailureBlock: true
          crowdsecAppsecUnreachableBlock: true
          crowdsecLapiKey: privateKey-foo
Instead if you define the configuration using labels on the containers you can add the following labels to the Traefik Plugin container.
  labels:
      - "traefik.http.middlewares.crowdsec-bar.plugin.bouncer.enabled=true"
      - "traefik.http.middlewares.crowdsec-bar.plugin.bouncer.crowdsecAppsecEnabled=true"
      - "traefik.http.middlewares.crowdsec-bar.plugin.bouncer.crowdsecAppsecHost=crowdsec:7422"
      - "traefik.http.middlewares.crowdsec-bar.plugin.bouncer.crowdsecLapiKey=privateKey-foo"
For more comprehensive documentation on the Traefik Plugin configuration, please refer to the official documentation.
We can't cover all the possible configurations for Traefik in this guide, so please refer to the official documentation for more information.
Directives
The following directives are available for the Traefik Plugin:
crowdsecAppsecEnabled
bool
Enable or disable the AppSec Component.
crowdsecAppsecHost
string
The host and port where the AppSec Component is running.
crowdsecAppsecFailureBlock
bool
If the AppSec Component returns 500 status code should the request be blocked.
crowdsecAppsecUnreachableBlock
bool
If the AppSec Component is unreachable should the request be blocked.
Validate the stack
Follow the Stack health check to confirm the CrowdSec engine, AppSec Component, and Traefik bouncer are working together as expected.
Integration with the console
If you haven't yet, follow the guide about how to enroll your Security Engine in the console.
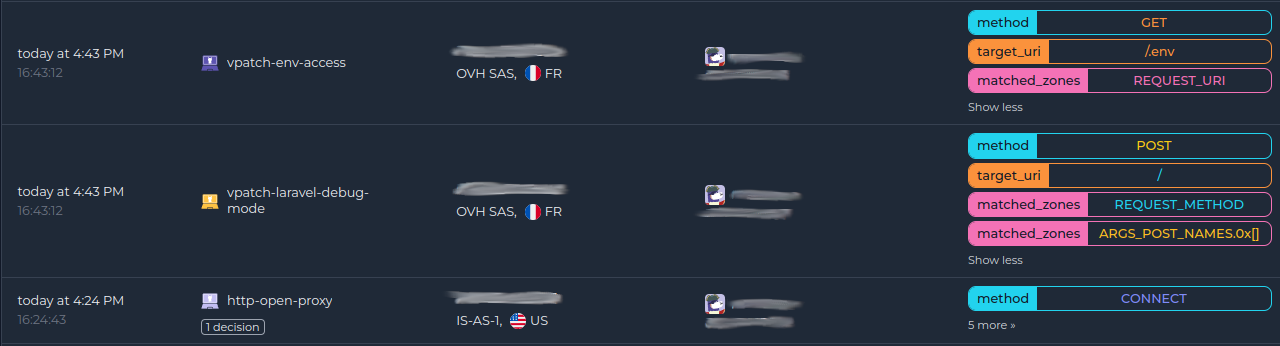
Once done, all your alerts, including the ones generated by the AppSec Component, are going to appear in the console:
Next steps
You are now running the AppSec Component on your Crowdsec Security Engine, congrats!
As the next steps, you can:
- Explore the hub to find more rules for your use case
- Look at the Rules syntax and creation process to create your own and contribute
- Take a look at the benchmarks

